It is very important to keep an eye on your RV plumbing for leaks. Leaks can cause a lot of damage, and it is difficult to find a leak until things are already bad.
By the time you notice, it may be too late, and you might have lost lots of money in repairs.
That’s why it is essential to know how to check for leaks in RV plumbing before they happen.
COMMON RV PLUMBING LEAKS
As mentioned earlier, a leak may be hard to spot until things are already bad, but with knowledge, you can quickly tell where a leak may be. Leaks tend to occur in certain places. These are:
1. Toilet Area
The toilet tank has several parts prone to leakage, including the flapper valve or ballcock assembly.
Toilets also have an overflow pipe which may be leaking when water reaches its maximum capacity.
2. Water Heater
A leaking water heater is a common issue in an RV. The most typical culprits are the fill and relief valves, which can leak when they become faulty or begin to wear out.
3. Connections
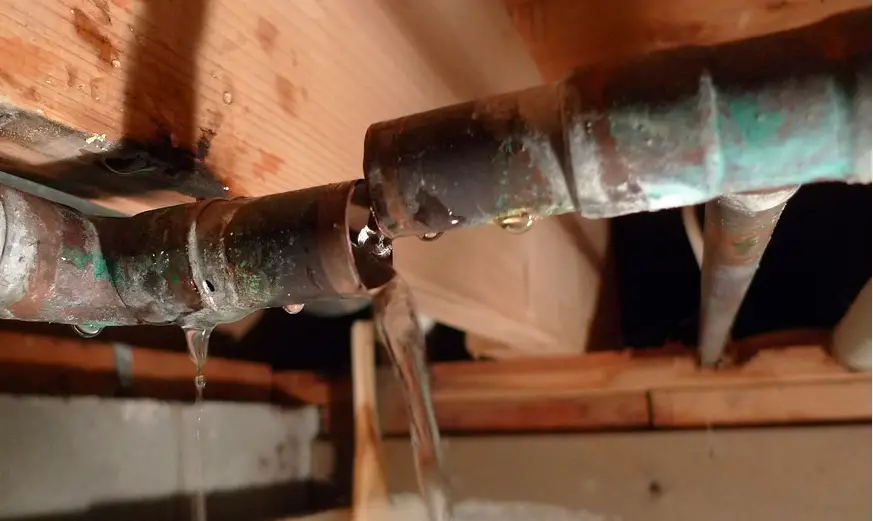
Inner connections on pipes such as elbows, couplings, T-fittings, fittings, and other fittings can leak when the lines inevitably begin to wear out.
4. Walls
Leaking pipes in the wall are pretty common because of how long homes have been constructed.
The most likely culprits for a leaky pipe are either corrosion, age, or faulty workmanship that has caused it to burst and create an opening.
5. Seals
The seals in an RV are intended to prevent water from escaping and causing damage.
However, there is always a chance that the seal may be worn out or deteriorating over time, leading to leaks.
REASONS FOR RV PLUMBING LEAKS
These leaks occur for several reasons:
1. Older RV plumbing fixtures and fittings are made of metal which is prone to corrosion.
Leaks from a corroded pipe fixture can be detected by the water stains they leave behind, or in some cases, small puddles on the floor.
2. Water heaters have an age limit as this appliance will eventually wear out as well.
The water heater’s life expectancy depends on its use and maintenance, but the average lifespan for a gas-powered unit is about 15 years, while an electric one lasts about 12 to 18 years.
3. Overflow pipes are prone to leaks that can happen when someone flushes too much toilet paper down the drain or if there is an overflow from the tank.
4. Wall leaks are caused by plumbing fixtures that have been installed poorly or faulty workmanship that has led to corrosion and erosion on pipes in the wall, which is then leaking water.
5. Water heater pipes may leak if the seal around them becomes cracked due to freezing temperatures or other external forces.
6. The water pump can also cause leaks or water damage if the seals around it are not secure.
7. Water leaks may also occur in some of the pipes going to a toilet, and occasionally they can even come from poorly placed hoses that go to sinks or tubs.
8. Poorly sealed fittings
9. Pipes that are not well-positioned or supported
FINDING RV PLUMBING LEAKS
There are a couple of ways through which you can find the leaks in your RV plumbing:
1. Running water through the piping
Leaks can be found by running water in the RV when it is not occupied and letting it run for a few minutes before inspecting various areas of concern.
A leak will usually cause a stain on the ceiling, which requires more inspection to determine if it is just a leak or mold.
2. Soapy water to identify bubbling areas
Another way to find leaks is by using soap and water on the pipes in the RV while observing for any bubbles that appear.
Bubbles often form when the air trapped within the lines is forced out by the pressure of the water. The bubble is the sign of a leak.
3. Close physical examination
Yet another way to find leaks is by looking for any wet areas inside the RV and then examining them more closely with no water running anywhere in the RV.
The damp area may just be condensation from air conditioners, but if there are signs that it might be leaking or molding, you must be sure.
Some of these leaks require you to remove the panels to reveal the piping network.
If the leak is along a pipe, it should be clearly visible. You can then use soap and water to identify the specific point that bubbles.
4. Leaks around water heating system
You’ll want to ascertain where the leak comes from for leaks around the water heater, the heater itself, or the piping.
Begin by feeling around the tank for any moisture that could be absorbed in the foam shell.
Next, inspect the cold water inlet and hot water outlet fittings at the bottom and top, respectively. These fittings and especially the seals, tend to wear out due to thermal shock.
If your heater has a bypass valve, there is a chance it could be dripping. Be sure to check it too.
5. Examine the pump
Sometimes the water pump raptures, but water follows the path of least resistance. You may therefore have a wet patch on the wall that has nothing to do with the piping on the wall.
As you check the lines and fittings, but if you don’t find any leaking pipe, it could be time to explore under the floor or behind wall panels where the pump may be located.
6. Pressurize the system with air
If you still can’t nail down the leak, you may need to completely drain the water system and connect pressurized air at the pump outlet.
This will expel all the water so that you can begin inspecting for leaks afresh.
You can even listen to the leaking air if at all the leak is big enough to permit blowing. This method will require soap and water to pinpoint the bubbling points.
7. Freeze damage
Tubing that has been damaged by freezing will be easy to identify. Freeze damage is usually accompanied by a bulging portion of the tube with a slit running axially along the tubing.
Often, freeze damage takes place on several points along the line. Although cutting out and replacing a burst section of the tube is easy, you need to pressurize the system with air to ascertain there are no more leaks.
FIXING SUCH RV PLUMBING LEAKS
Before a leak can be fixed, the exact location of the leak has to be found. After finding the leak, establish what material makes up the affected part.
If it is burst tubing you are dealing with, like freeze damage, you’ll need to cut the burst section and replace it with a good one.
As mentioned earlier, freeze damage affects several points along the tubing, so you’ll need to locate them all.
Sometimes the whole length of the tube will be badly damaged to even attempt repair. In such cases, replace the entire length of the line.
You will need as many pipe fitting as the number of sections that you cut to replace with undamaged piping.
If you are dealing with a leak in the valve, tighten it. If that doesn’t work, then replace it.
Lastly, if there is no visible leak or not one to be found by following these steps, consult your RV manufacturer for more help on fixing plumbing leaks and where they can occur inside an RV.
DIY – Can you do it yourself
There are several factors to consider before deciding whether to handle the repair by yourself or outsource to a professional.
These are:
1.Warranty
Your RV may still be covered by the manufacturer’s warranty.
In this case, do not attempt anything that can void the agreement. Just contact the manufacturer for specialized repair.
2. Level of expertise
If you are an experienced plumber, things like cutting a piece of tubbing and replacing may be simple for you. However, you may still need a professional.
For example, if you have to remove side panels or the floor to reveal the lines and fittings, you’ll want to avoid doing it yourself, unless you are experienced at this too.
Generally, whenever a concept is too complicated for you, it’s best to seek professional help.
You could cause more damage to the RV trying to fix a more minor issue because you weren’t sure of something and ended up breaking things.
Cost of repairing plumbing leaks
The cost of repairing a leak depends on the nature of the leak, who does the repair job, and what materials are needed.
If there is any specialized clean-up job after the repair, that will be another cost.
A leak on the water heater storage tank will most likely call for a new water heater system, which can cost hundreds of dollars.
A leak on the tubing, on the other hand, will cost you a couple of dollars for a piping section with which to replace and a dollar or so for the fittings.
Seals are even cheaper. The cost may skyrocket if you outsource skilled labor for the job.
If the RV is still under warranty, it’ll probably cost you no more than driving to the service center and back.
How to prevent/stop such leaks
The following is a list of things one should do to prevent plumbing leaks:
1. Inspect any new parts you purchase for your RV before installing them and make sure all fittings are sealed
2. Have your water pump installed by a professional to ensure the seals around it provide a tight seal against the surface.
This will help avoid leaks and other problems in this area of your RV’s plumbing system.
3. It is crucial that all parts that you purchase be inspected before they’re installed, especially fittings, because it is where most leaks come from.
Conclusion
In order to prevent RV plumbing leaks, all fixtures must be inspected regularly.
In the end, you can make sure your RVs are leak-free by following the above care and maintenance practices.